| Version 2 (modified by , 12 years ago) ( diff ) |
|---|
WIZ820ioをつかってみました
内容
春先にWIZ820ioのお試しキャンペーンをさせていただきました。
遅まきながら、ご応募いただいた方のブログなどを参考に、WIZ820ioを使ってみましたので、ご紹介いたします。
ちなみにArduino IDE 1.0.1を使いました。
使用部品など
- WIZ820io
- Arduino Uno
- 普通のブレッドボード
- 普通のジャンパワイヤ(オス~オス)
- 5Vから3.3Vに変換する回路
今回はSparkFunブレッドボード用電源ボードUSB版(キット)を使ってみました。
その他、USBケーブルやら、LANケーブルやら、ネットワークハブやら適宜ご用意ください。
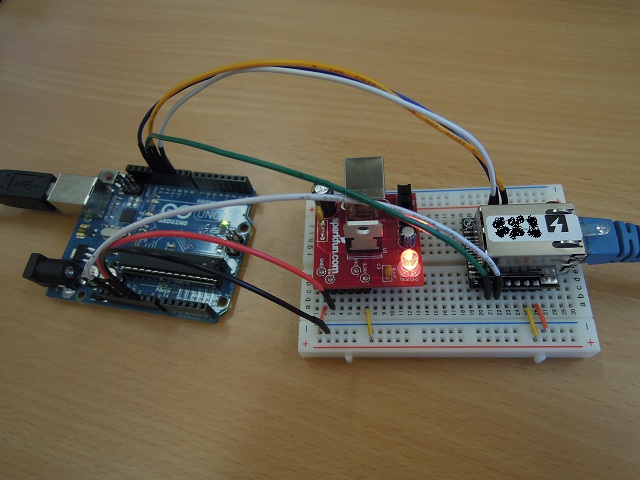
配線
Arduino Uno ⇔ WIZ820io
- D10 → nSS
- D11 → MOSI
- D12 ← MISO
- D13 → SCLK
- RESET → nRESET
- GND ⇔ GND
- 5V→「5V→3.3V変換」→VIN3.3
Arduino Unoにも3.3V出力がありますが、WIZ820ioの最大消費電流120mAには足りないので、5Vから3.3Vを作っています。
写真

ライブラリのダウンロード
WIZnetさんのダウンロードページから「Library for Arduino + Ethernet」をダウンロードしてください。
その中のw5100.hとw5100.cppを、Arduino IDEのフォルダのlibraries/Ethernet/utility/の中にある同名ファイルと差し替えてください。
さらに、Arduino IDEのフォルダのlibraries/Ethernet/のEthernet.hを以下の様に書き換えます。
#ifndef ethernet_h
#define ethernet_h

#include <inttypes.h>
#include "utility/w5100.h"  // ←変更行 w5100.hを有効にします
#include "IPAddress.h"
#include "EthernetClient.h"
#include "EthernetServer.h"
#include "Dhcp.h"

// #define MAX_SOCK_NUM 4  // ←変更行 この行を無効にします

class EthernetClass {
private:
  IPAddress _dnsServerAddress;
  DhcpClass* _dhcp;
public:
  static uint8_t _state[MAX_SOCK_NUM];
  static uint16_t _server_port[MAX_SOCK_NUM];
  // Initialise the Ethernet shield to use the provided MAC address and gain the rest of the
  // configuration through DHCP.
  // Returns 0 if the DHCP configuration failed, and 1 if it succeeded
  int begin(uint8_t *mac_address);
  void begin(uint8_t *mac_address, IPAddress local_ip);
  void begin(uint8_t *mac_address, IPAddress local_ip, IPAddress dns_server);
  void begin(uint8_t *mac_address, IPAddress local_ip, IPAddress dns_server, IPAddress gateway);
  void begin(uint8_t *mac_address, IPAddress local_ip, IPAddress dns_server, IPAddress gateway, IPAddress subnet);
  int maintain();

  IPAddress localIP();
  IPAddress subnetMask();
  IPAddress gatewayIP();
  IPAddress dnsServerIP();

  friend class EthernetClient;
  friend class EthernetServer;
};

extern EthernetClass Ethernet;

#endif
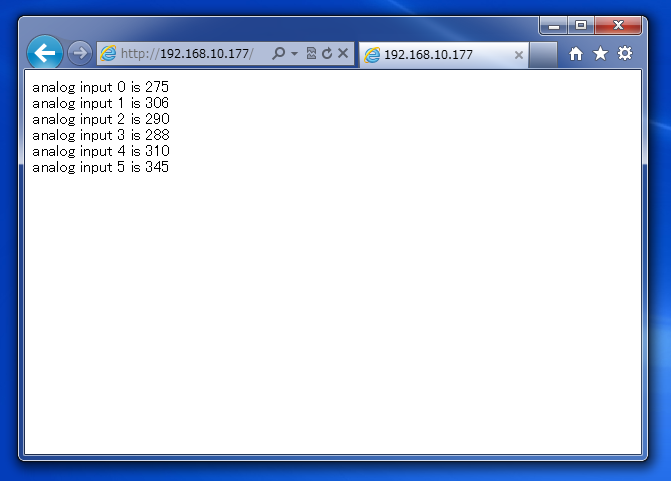
テスト
Arduino IDEを立ち上げて、ファイル→スケッチの例→Ethernet→WebServerをクリック。 出てきたスケッチの
byte mac[] = {
  0xDE, 0xAD, 0xBE, 0xEF, 0xFE, 0xED };
IPAddress ip(192,168,1, 177);
この部分を適宜書き換えてArduino Unoにアップロードします。 パソコンのブラウザで、書き込んだIPアドレスにアクセスします。 ブラウザにA0~A5の読み取り値が表示されればOKです。
補足
このままだとEthernetライブラリがW5200を使ったモジュールにしか対応しません。
従来のW5100を使ったモジュール(Arduino イーサネットシールド R3)等を使ってスケッチをコンパイルする時は、事前に
Arduino IDEのフォルダのlibraries/Ethernet/utility/のw5100.hを開いて
#define W5200
の行の頭に を付けてコメントにしてください。 差し替えたファイルを元に戻す必要はありません。
謝辞
キャンペーンにご応募いただた
@ytsuboi さま、@misodengaku さま、Nasupl さま、shigehiro さま、@a_ono さま、まつばば さま
参考にさせていただきました。ありがとうございました。
Attachments (3)
- WIZ820ioTest.jpg (98.4 KB ) - added by 12 years ago.
- WIZ820ioTest2.jpg (98.3 KB ) - added by 12 years ago.
- WebServer.png (74.8 KB ) - added by 12 years ago.
Download all attachments as: .zip