| Version 8 (modified by , 9 years ago) ( diff ) |
|---|
ピロピロ入力インターフェースの作り方
- ピロピロ(吹き戻し)を用意する
家電量販店やおもちゃ屋さん、駄菓子屋さんで購入することができます。
- 電子部品を揃える
- Bluetoothモジュール RN-42-I/RM x 1
- 測距モジュール GP2Y0E02A(アナログ出力) x 1
- 3.3V出力DCDCコンバータ x 1
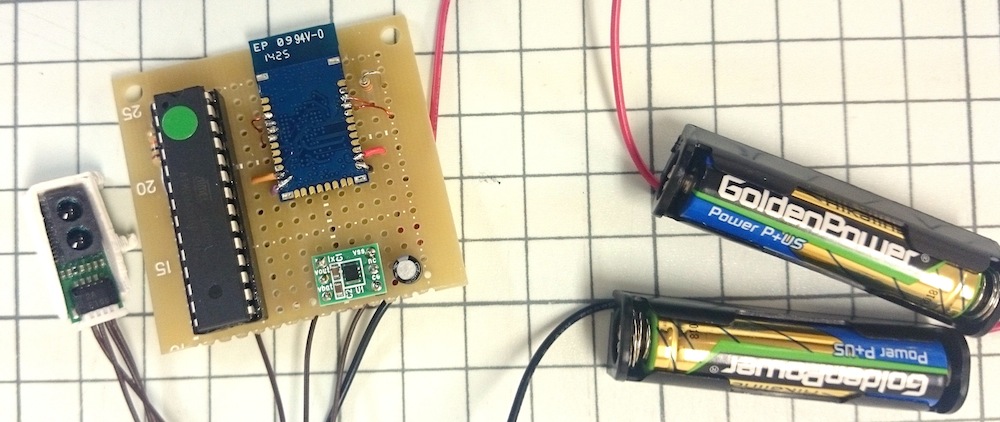
- 蛇の目基板 x 1
- 電池ボックス 単4×1本用 x 2
- ICソケット x 1
- 電解コンデンサ 10μF x 1
- 抵抗 10kΩ x 1
- 単4形アルカリ乾電池 x 2
- Arduinoブートローダ書き込み済みATMega328P-PU(内蔵CR発振8MHz版) x 1
これらの部品はピロピロインターフェース 電子部品キットに含まれています。
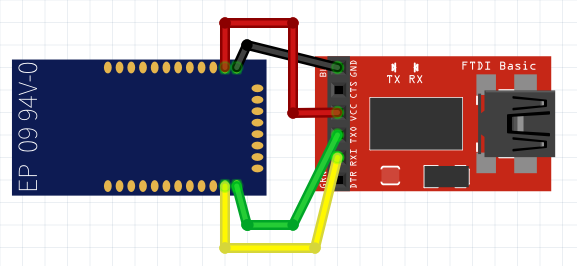
- 回路を組み立てる
以下の実体配線図と同じ回路を蛇の目基板上に組み立ててください。
- Bluetoothモジュールの設定をする
- BluetoothモジュールをUSBシリアル変換アダプタなどでパソコンと接続してください。
- シリアルコンソールを開いて、"$$$"と打ち込んで"CMD"と返ってきたら、以下のコマンドを打ち込んでください。
SU,115k
SM,6
SA,2
S~,6
SH,0000
SN,MY_PIROPIRO_KEYBOARD
R,1
- ATmega328にスケッチを書き込む
Arduino UNOなどを使って、ATmega328にスケッチを書き込んでください。
そのときにボードの設定はArduino Pro or Pro Mini, ATmega328(3.3V, 8MHz)を選んでください。
スケッチ
/*
 * Copyright 2015 Google Inc.
 *
 * Licensed under the Apache License, Version 2.0 (the "License");
 * you may not use this file except in compliance with the License.
 * You may obtain a copy of the License at
 *
 *     http://www.apache.org/licenses/LICENSE-2.0
 *
 * Unless required by applicable law or agreed to in writing, software
 * distributed under the License is distributed on an "AS IS" BASIS,
 * WITHOUT WARRANTIES OR CONDITIONS OF ANY KIND, either express or implied.
 * See the License for the specific language governing permissions and
 * limitations under the License.
 */

/*
 * Firmware of piropiro (party horn) Bluetooth keyboard.
 */

#define V_REF 5.0
#define PIN_LED 13
#define N_AD_SAMPLES 10

#define INTERVAL_MSEC 20
#define COMMIT_TIME (600 / INTERVAL_MSEC)

#define ROWS 5
#define COLS 10

const char* characters[ROWS * COLS] = {
  "a", "i", "u", "e", "o",
  "ka", "ki", "ku", "ke", "ko",
  "sa", "si", "su", "se", "so",
  "ta", "ti", "tu", "te", "to",
  "na", "ni", "nu", "ne", "no",
  "ha", "hi", "hu", "he", "ho",
  "ma", "mi", "mu", "me", "mo",
  "ya", "ya", "yu", "yu", "yo",
  "ra", "ri", "ru", "re", "ro",
  "wa", "wo", "nn", ",", "."
};

int column = 0;
int vowel = 0;
int release_duration = 0;

void setup() {
  Serial.begin(115200);
  pinMode(PIN_LED, OUTPUT);
  column = 0;
  vowel = 0;
}

float getVoltage(int ch) {
  return analogRead(ch) * V_REF / 1023;
}

float getAverageVoltage(int ch) {
  float sum = 0.0;
  for (int i = 0; i < N_AD_SAMPLES; i++) {
    sum += getVoltage(ch);
  }
  return sum / N_AD_SAMPLES;
}

float voltageToLength(float voltage) {
  return 648 - voltage * 268;
}

void loop() {
  float length = voltageToLength(getAverageVoltage(0));
  if (length > 350) {
    digitalWrite(PIN_LED, LOW);
  } else {
    digitalWrite(PIN_LED, HIGH);
    if (length < 50) {
      if (vowel > 0) {
        vowel = 0;
        column ++;
        if (column >= COLS) {
          column = 0;
        }
        release_duration = 0;
      } else if (release_duration > COMMIT_TIME) {
        vowel = 0;
        column = 0;
      } else if (column > 0) {
        release_duration ++;
      }
    } else {
      int target_vowel = (length - 80) / 40 + 1;
      if (target_vowel > 5) target_vowel = 5;
      if (vowel < target_vowel) {
        if (column > 0 || vowel > 0) {
          Serial.print("\b");
        }
        vowel ++;
        int current_character = vowel - 1 + column * 5;
        Serial.print(characters[current_character]);
      }
    }
  }
  delay(INTERVAL_MSEC);
}
- 3Dプリンタで固定用部品を出力する
Makerbotなどの3Dプリンタで部品を出力してください。
7.ピロピロに各部品をくっつけたら完成です。
手持ちのスマートフォンとペアリングして遊んでみてください。
おまけ.遊び方について
- 子音の数だけ素早くピロピロを吹きます(例:た行の場合は4回)。
- 母音に合わせてピロピロの長さを調節します(例:う段の場合は真ん中くらい)。
- これで「つ」を入力することができます。
Attachments (3)
- piropiro-bt.png (34.7 KB ) - added by 9 years ago.
- piropiro-real.JPG (135.8 KB ) - added by 9 years ago.
- piropiro-circuit.png (123.3 KB ) - added by 9 years ago.
Download all attachments as: .zip
Note:
See TracWiki
for help on using the wiki.