ピロピロ入力インターフェースの作り方
- ピロピロ(吹き戻し)を用意する
家電量販店やおもちゃ屋さん、駄菓子屋さんで購入することができます。
- 電子部品を揃える
- Bluetoothモジュール RN-42-I/RM x 1
- 測距モジュール GP2Y0E02A(アナログ出力) x 1
- 3.3V出力DCDCコンバータ x 1
- ユニバール基板 x 1
- 電池ボックス 単4×1本用 x 2
- ICソケット x 1
- 電解コンデンサ 10μF x 1
- 抵抗 10kΩ x 1
- 単4形アルカリ乾電池 x 2
- Arduinoブートローダ書き込み済みATMega328P-PU(内蔵CR発振8MHz版) x 1
これらの部品はピロピロインターフェース 電子部品キットに含まれています。 ピロピロインターフェースには必要ありませんが、製作途中に必要なものもあります。
- ATMega328を書き込むためのhttps://www.switch-science.com/catalog/789/ Arduino Uno
- Bluetoothの設定をするためのhttps://www.switch-science.com/catalog/1534/ USBシリアル変換モジュール
- BluetoothモジュールとUSBシリアル変換モジュールとを繋ぐためのhttps://www.switch-science.com/catalog/620/ やわらかいジャンパワイヤ
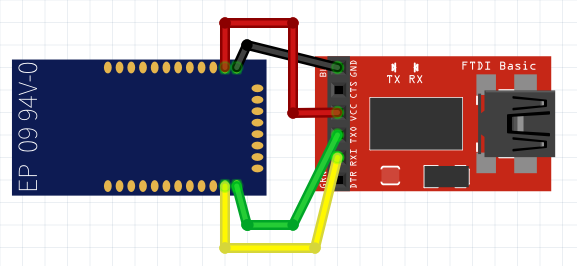
- 回路を組み立てる
以下の実体配線図と同じ回路をユニバーサル基板上に組み立ててください。

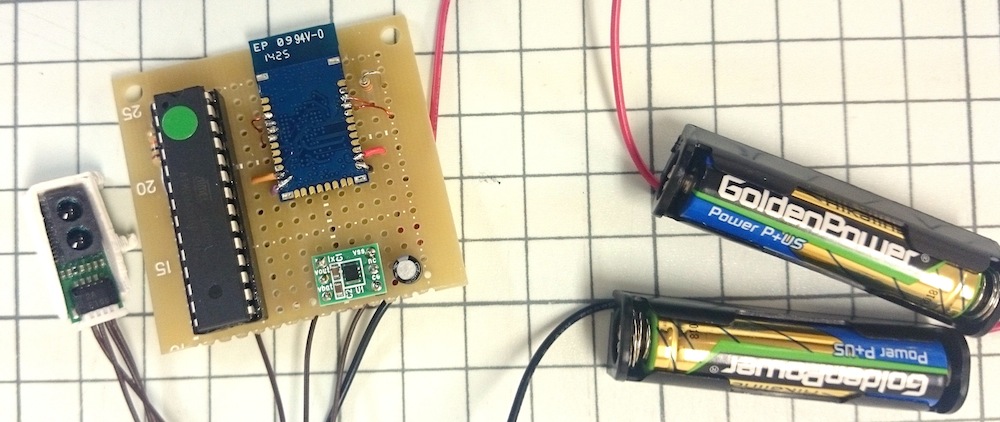
実際にユニバーサル基板上に組み立てるとこんな感じになります。(いろいろ汚くてすみません)

- Bluetoothモジュールの設定をする
- BluetoothモジュールをUSBシリアル変換アダプタなどでパソコンと接続してください。
- ピンソケットにhttps://www.switch-science.com/catalog/620/ やわらかいジャンパワイヤを挿すと接続しやすいです。
- シリアルコンソールを開いて、"$$$"と打ち込んで"CMD"と返ってきたら、以下のコマンドを打ち込んでください。
SU,115k
SM,6
SA,2
S~,6
SH,0000
SN,MY_PIROPIRO_KEYBOARD
R,1

- ATmega328にスケッチを書き込む
Arduino UNOなどを使って、ATmega328にスケッチを書き込んでください。
そのときにボードの設定はArduino Pro or Pro Mini, ATmega328(3.3V, 8MHz)を選んでください。
スケッチ
/*
 * Copyright 2015 Google Inc.
 *
 * Licensed under the Apache License, Version 2.0 (the "License");
 * you may not use this file except in compliance with the License.
 * You may obtain a copy of the License at
 *
 *     http://www.apache.org/licenses/LICENSE-2.0
 *
 * Unless required by applicable law or agreed to in writing, software
 * distributed under the License is distributed on an "AS IS" BASIS,
 * WITHOUT WARRANTIES OR CONDITIONS OF ANY KIND, either express or implied.
 * See the License for the specific language governing permissions and
 * limitations under the License.
 */

/*
 * Firmware of piropiro (party horn) Bluetooth keyboard.
 */

#define V_REF 5.0
#define PIN_LED 13
#define N_AD_SAMPLES 10

#define INTERVAL_MSEC 20
#define COMMIT_TIME (600 / INTERVAL_MSEC)

#define ROWS 5
#define COLS 10

const char* characters[ROWS * COLS] = {
  "a", "i", "u", "e", "o",
  "ka", "ki", "ku", "ke", "ko",
  "sa", "si", "su", "se", "so",
  "ta", "ti", "tu", "te", "to",
  "na", "ni", "nu", "ne", "no",
  "ha", "hi", "hu", "he", "ho",
  "ma", "mi", "mu", "me", "mo",
  "ya", "ya", "yu", "yu", "yo",
  "ra", "ri", "ru", "re", "ro",
  "wa", "wo", "nn", ",", "."
};

int column = 0;
int vowel = 0;
int release_duration = 0;

void setup() {
  Serial.begin(115200);
  pinMode(PIN_LED, OUTPUT);
  column = 0;
  vowel = 0;
}

float getVoltage(int ch) {
  return analogRead(ch) * V_REF / 1023;
}

float getAverageVoltage(int ch) {
  float sum = 0.0;
  for (int i = 0; i < N_AD_SAMPLES; i++) {
    sum += getVoltage(ch);
  }
  return sum / N_AD_SAMPLES;
}

float voltageToLength(float voltage) {
  return 648 - voltage * 268;
}

void loop() {
  float length = voltageToLength(getAverageVoltage(0));
  if (length > 350) {
    digitalWrite(PIN_LED, LOW);
  } else {
    digitalWrite(PIN_LED, HIGH);
    if (length < 50) {
      if (vowel > 0) {
        vowel = 0;
        column ++;
        if (column >= COLS) {
          column = 0;
        }
        release_duration = 0;
      } else if (release_duration > COMMIT_TIME) {
        vowel = 0;
        column = 0;
      } else if (column > 0) {
        release_duration ++;
      }
    } else {
      int target_vowel = (length - 80) / 40 + 1;
      if (target_vowel > 5) target_vowel = 5;
      if (vowel < target_vowel) {
        if (column > 0 || vowel > 0) {
          Serial.print("\b");
        }
        vowel ++;
        int current_character = vowel - 1 + column * 5;
        Serial.print(characters[current_character]);
      }
    }
  }
  delay(INTERVAL_MSEC);
}
- 3Dプリンタで固定用部品を出力する
Makerbotなどの3Dプリンタで部品を出力してください。
7.ピロピロに各部品をくっつけたら完成です。
手持ちのスマートフォンとペアリングして遊んでみてください。
おまけ.遊び方について
- 子音の数だけ素早くピロピロを吹きます(例:た行の場合は4回)。
- 母音に合わせてピロピロの長さを調節します(例:う段の場合は真ん中くらい)。
- これで「つ」を入力することができます。
Last modified
10 years ago
Last modified on Apr 9, 2015, 3:42:57 PM
Attachments (3)
- piropiro-bt.png (34.7 KB ) - added by 10 years ago.
- piropiro-real.JPG (135.8 KB ) - added by 10 years ago.
- piropiro-circuit.png (123.3 KB ) - added by 10 years ago.
Download all attachments as: .zip
Note:
See TracWiki
for help on using the wiki.